Announcement

Collapse
No announcement yet.

Buck's random home-made things.

Collapse

Forum Thread First Post

Collapse
X
 
  • Filter
  • Time
  • Show
Clear All
new posts

  • #91
    flashlight mount, and rearview mirror mount.

    New springs and shocks arrived today! Shackles should arrive in a few days, then I'll get started putting them on I went with a 2.5" superlift, should be an easy bolt on.


    [COLOR="#FF0000"]R[/COLOR]edneck [COLOR="#FF0000"]D[/COLOR]riveway [COLOR="#FF0000"]F[/COLOR]ab
    www.DanielBuck.net - www.DNSFAIL.com - www.FurnitureByBuck.com

    Comment


    • #92
      Originally posted by daniel_buck View Post
      I got the rest of it welded up at my friends house, wow the welder feels so much more powerful with 220 power and the .035 wire (not sure if the wire makes much difference or not?) I NEED 220 power at home now, haha! Or a generator. The difference was quite noticable. tack welding at home at full power on 110, these thick metals the tack weld is like a ball that sits on top of the metal. With 220 at full power, the tack sinks into the metal alot more, and doesn't just rest on top. I like
      Told ya so! 110 is for girls

      Don't bother with the generator--you're much better off with shore power, and it's a LOT cheaper. There are two basic kinds of generators out there: CC (constant current), and CV (constant voltage). Although it will work in a pinch, CC is really no bueno for MIG welding. CC is good for stick and TIG, but you really want CV for good MIG welds. I've tried it and decided if I didn't have CV (shore power or generator), I wouldn't use MIG. The other day I had to fix a broken divider hinge in a horse trailer, but the base metal was thin and rusty tubing--too thin for stick, and too nasty for TIG, and too far from my shore power. I used my 10000W CC generator to power my MIG, and I got 'er done on full power (to compensate a bit for CC), and you know what? Watching the puddle cool as I welded I could tell (by how it looks) that I was getting some cold lap on 16GA set at full power on my little Lincoln 175. Some of that was downhill, but come on--16GA!

      The wire size does make a difference, because more wire equals more current carrying capacity. Of course, more wire also needs more voltage to melt it, since watts (energy) = volts X amps. Anywho, thicker wire generally works better at higher power settings needed to weld thicker metal. I've used .023 at full blast in my 175, but keeping it going can be problematic, because the little wire sometimes melts off inside the tip, at least with a standard 85/15 MIG mix. I like .030 or .035 unless I'm doing thin sheet.

      Gas mix affects things too. With .023 and a 98/2 mix you should just be able to get that little MIG to achieve spray transfer (look it up). Hope to try it myself sometime. Accidentally did it for about 1" running 85/15, but that was freak. With .035 Innershield and a high feed rate (and of course, reverse polarity) my Lincoln 175 (and I assume yours) will do spray transfer very nicely. Great penetration, but only good for flat position. Someone on here was saying how straight Argon was screwing up their MIG welding because of arc wander, etc., but I've had good success with it when I've used it. Penetration isn't as good, though.
      holes = cowbell

      Comment


      • #93
        Good to know about the generator, thanks!

        the finished press brake. I may or may not use the guide rails, I'll put them on if I feel the need to later once i start bending stuff.

        Threw a test piece of steel in there, 1/4" thick and about 6 inches across, bent it very easily. Awesome I don't think I'll be working with materials that thick very often, but nice to know that I can bend some thick stuff if needed.

        Not to pleased with how the welds look, but oh well, still getting more practice The whole starting, stopping, and re-starting thing I can never make look smooth. And it looks like I wasn't always traveling in the same direction, didn't even think about that. I was at full power for these welds, the lower die and die holder that are welded together are 3/8" I think. It was fun sticking together pieces this thick


        Last edited by daniel_buck; 01-04-13, 12:52 AM.
        [COLOR="#FF0000"]R[/COLOR]edneck [COLOR="#FF0000"]D[/COLOR]riveway [COLOR="#FF0000"]F[/COLOR]ab
        www.DanielBuck.net - www.DNSFAIL.com - www.FurnitureByBuck.com

        Comment


        • #94
          random photo of the jeep :-D

          [COLOR="#FF0000"]R[/COLOR]edneck [COLOR="#FF0000"]D[/COLOR]riveway [COLOR="#FF0000"]F[/COLOR]ab
          www.DanielBuck.net - www.DNSFAIL.com - www.FurnitureByBuck.com

          Comment


          • #95
            Originally posted by daniel_buck View Post
            random photo of the jeep :-D

            Based on the device under the Jeep, it is not yet potty trained......
            Rich

            Comment


            • #96
              if it's not leaking, it's empty ;-) haha!
              [COLOR="#FF0000"]R[/COLOR]edneck [COLOR="#FF0000"]D[/COLOR]riveway [COLOR="#FF0000"]F[/COLOR]ab
              www.DanielBuck.net - www.DNSFAIL.com - www.FurnitureByBuck.com

              Comment


              • #97
                Made a very crude bikini top. I don't like how it looks, but at least for now it will keep the sun off my face a bit. A friend's wife is letting me use her sewing machine, it turned out good in some areas, and not so good in other areas.

                I'll work on a better design. I want something that can easilly be used with the windshield flopped down, so I don't know if I want to attach it to the windshield, or just leave it attatched to the cage. Right now it's a bit narrow, I'd like to have it stick out farther on the sides, but when I tried that with the material (before I cut and stitched it) I wasn't finding a way to keep the sides from flapping like crazy.

                hammering in the metal grommets into the fabric is fun, and surprisingly easy

                Next thing to make is a transmission cover, now that I have a way to bend and cut sheet metal nicely. And maybe I'll sew up my own shift boots, if leather isn't to thick for the sewing machine, haha


                Last edited by daniel_buck; 01-06-13, 09:10 PM.
                [COLOR="#FF0000"]R[/COLOR]edneck [COLOR="#FF0000"]D[/COLOR]riveway [COLOR="#FF0000"]F[/COLOR]ab
                www.DanielBuck.net - www.DNSFAIL.com - www.FurnitureByBuck.com

                Comment


                • #98
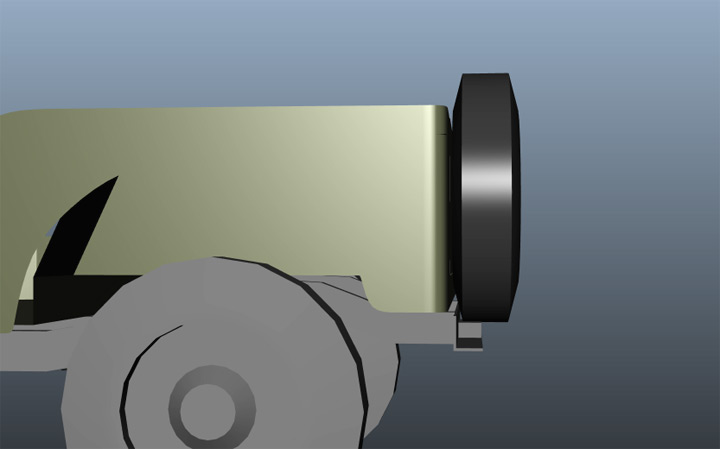
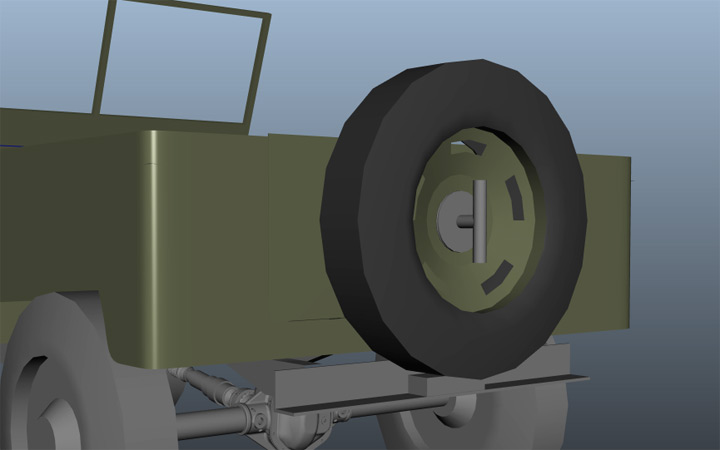
                  Time to make a spare tire mount! I didn't want to get into making a swing away carrier, because it would probably just rattle alot, and I don't use my tail gate all that often, so I don't need to move the spare tire hardly ever.

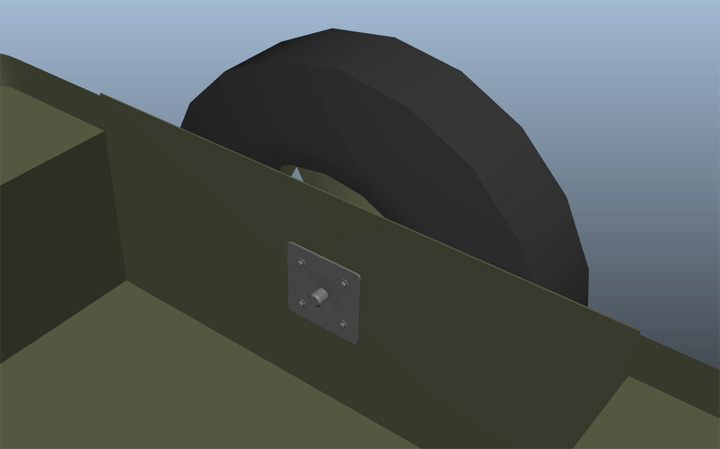
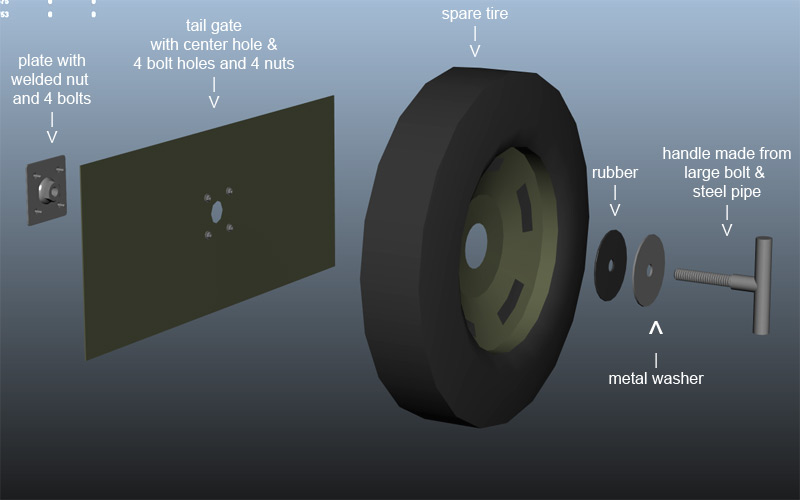
                  I wanted it as close to the body as possible (not sticking way out) and did NOT want to put the weight on the tail gate. So this is my design. Inspired by how my spare tire is mounted on the TJ, which has an OR-FAB tire carrier that uses a single large T bolt, and sandwiches the tire against the bolt/washer and the tire carrier. In the case of the willys however, I will be sandwiching the tire against the tail gate itself, and the tire will be resting it's weight on a metal block that is either bolted or welded to the factory bumper/crossmember. That will take most of the load off the tail gate.

                  I'm debating if I want to do it off centered, so that I could mount a gas can to the crossmember & tail gate in a similar manor, where the weight is resting on the crossmember and not the tail gate. I'll think a bit before I commit to mounting the tire centered, or off to one side. Off to the side might actually work best, since there isn't a flat area of metal right in the center of the tail gate.

                  Since the center hole of the wheel is much larger than the T bolt, I could rest the weight of the tire fully on the bumper/crossmember, and then just insert the T-bolt through the wheel to nut that's welded to the plate on the inside of the tail gate, and snug the T-bolt down. The sidewall of the tire would be pressed against the tail gate. The tire will compress just a bit as it touches the tail gate, keeping it from rotating. (works great on my TJ!)


                  Last edited by daniel_buck; 01-26-13, 07:45 PM.
                  [COLOR="#FF0000"]R[/COLOR]edneck [COLOR="#FF0000"]D[/COLOR]riveway [COLOR="#FF0000"]F[/COLOR]ab
                  www.DanielBuck.net - www.DNSFAIL.com - www.FurnitureByBuck.com

                  Comment


                  • #99
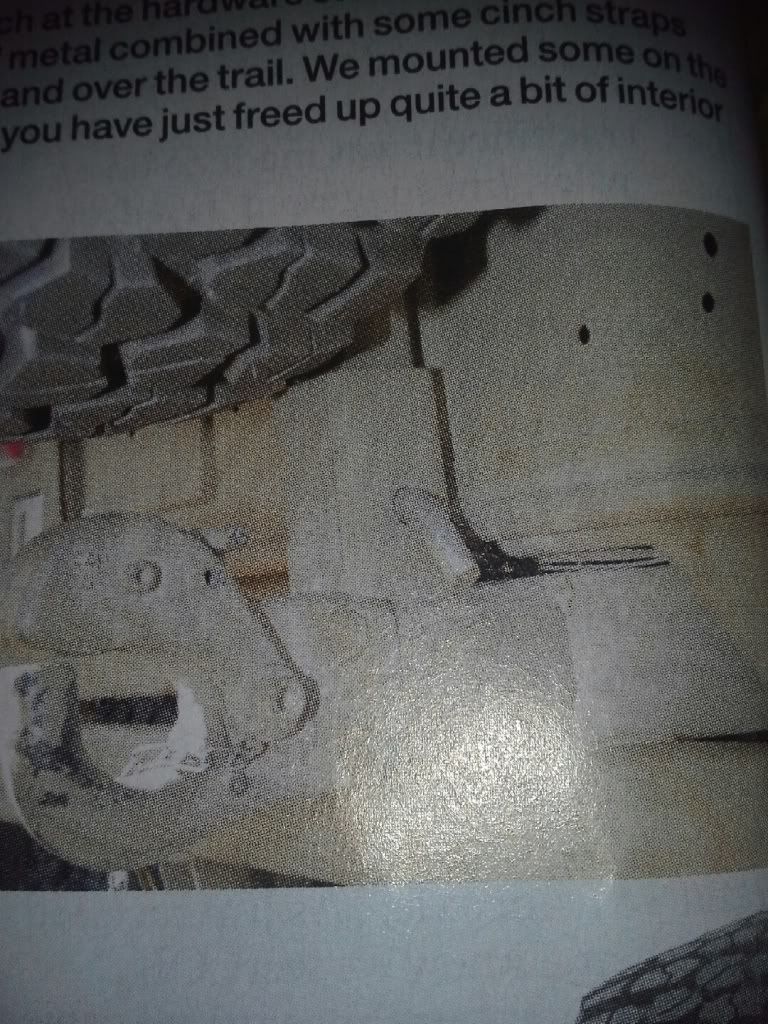
                    All this is looking really cool Daniel! I saw in one of the magazines this month a really cool removable spare tire holder for a Willy's like yours... The ideas is simple and its easily removable so you don't have to cut into the tailgate. Basically they just welded a piece of square tube metal (just like the kind you used on your table) to the top of the hitch receiver with the opening facing straight up. Then they just added a smaller piece of square tube metal inside that was about as tall as the tailgate. Then they made a bracket for the spare to mount to and drilled a hole through the two pieces at the base to put a bolt through to keep your spare from flying out and were done with it. I will try to see what magazine I saw that in. I think it may have been the one with the "cheap fixed" article.

                    B

                    Comment


                    • Hm interesting! I'll have to look at that article if I can find it. How was the tire actually secured?
                      [COLOR="#FF0000"]R[/COLOR]edneck [COLOR="#FF0000"]D[/COLOR]riveway [COLOR="#FF0000"]F[/COLOR]ab
                      www.DanielBuck.net - www.DNSFAIL.com - www.FurnitureByBuck.com

                      Comment


                      • something similar to what you are going to use... "the plate welded with 4 bolts" ahh.. I just found it.... March 13 of JP. Good thing I have nothing else to do home with flu...


                        Comment


                        • looks like that would make the tail gate completely unusable? Even if you removed the sliding tube that's held in with the big pin, the square tube that's welded to the receiver would hit the tail gate? Or is that entire receiver removable too? So the tire isn't even connected to the tail gate at all, eh? nice

                          Thanks for digging that up though! Get well quickly :-D
                          [COLOR="#FF0000"]R[/COLOR]edneck [COLOR="#FF0000"]D[/COLOR]riveway [COLOR="#FF0000"]F[/COLOR]ab
                          www.DanielBuck.net - www.DNSFAIL.com - www.FurnitureByBuck.com

                          Comment


                          • that is a good point. It seems it keeps the pressure off the sheet metal of the tailgate. I guess they figure they can reach over the tailgate to get anything they may need out of the back. You tell me how much room there is if you stand behind her and reach in.... just my 2 cents and thanks... I am day/nyquilled up pretty good right now... ugh!

                            Comment


                            • HAHA! yea, I hardly ever use my tail gate in the willys, but I HAVE used it a few times, when I was moving some furniture and other larger items that had to hang out the back. At the very least, I'd like to be able to use the tail gate, even if it means leaving the spare tire at home for the day.
                              [COLOR="#FF0000"]R[/COLOR]edneck [COLOR="#FF0000"]D[/COLOR]riveway [COLOR="#FF0000"]F[/COLOR]ab
                              www.DanielBuck.net - www.DNSFAIL.com - www.FurnitureByBuck.com

                              Comment


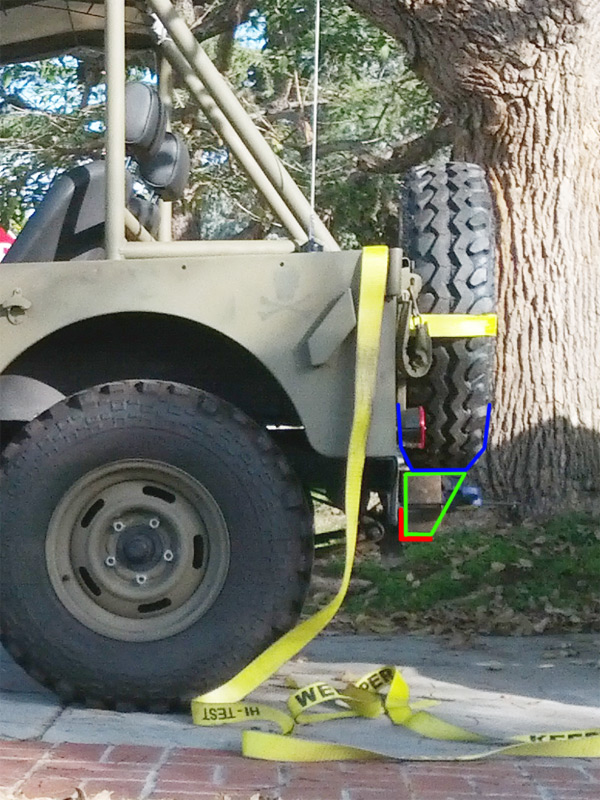
                              • So I had some time to play around today, I put a wood block on the bumper and set the tire on top, and strapped the tire to the tailgate (strap going all the way around the tail gate, horizontally), and I think this will totally work, and I can do it two ways. One which involves no drilling and nothing permanently attached to the jeep, and the other is my idea above, drilling through the tail gate.


                                Both will require a metal bracket that raises the tire about 6 inches off the bottom of the bumper, so I'll go ahead and start making that as soon as I have more free time. But I tried strapping the tire to the tail gate, and man it's really on there pretty solidly, even with just one strap going horiziontal. I would probably also use a second strap going vertical to help out on big bumps where the tire would want to fly upwards. I think it would totally work even just with straps. The side wall being pressed against the tail gate really grips pretty darn good, and I didn't even ratchet it down super tight.


                                Here's a quick photoshop illustration. Red is the current bumper, Green would be the profile of the bracket, and blue is the profile of the tire. The width of the bracket will probably only need to be about 6 inches wide, there's already holes in the bumper that I can bolt to.


                                I won't be doing crazy rock trails with this, but I think this will still leave me a pretty good departure angle. And even with just the straps, I don't think that tire is going anywhere, I gave it a real good shove back and forth, the tail gate didn't even rattle (I've got thin rubber bumpers inbetween the tail gate & tub)

                                I'm going to camp in hungry valley in a few weekends, if I don't have a chance to make the metal bracket, I'll just use the wood block, screw it to the holes that are already in the bumper, and also and clamp it down real good, just to see how the strap idea holds up on bumps & such. I'll put a second strap going vertically on the tire as well.


                                Last edited by daniel_buck; 01-27-13, 04:23 PM.
                                [COLOR="#FF0000"]R[/COLOR]edneck [COLOR="#FF0000"]D[/COLOR]riveway [COLOR="#FF0000"]F[/COLOR]ab
                                www.DanielBuck.net - www.DNSFAIL.com - www.FurnitureByBuck.com

                                Comment

                                Working...
                                X