Announcement

Collapse
No announcement yet.

Buck's random home-made things.

Collapse

Forum Thread First Post

Collapse
X
 
  • Filter
  • Time
  • Show
Clear All
new posts

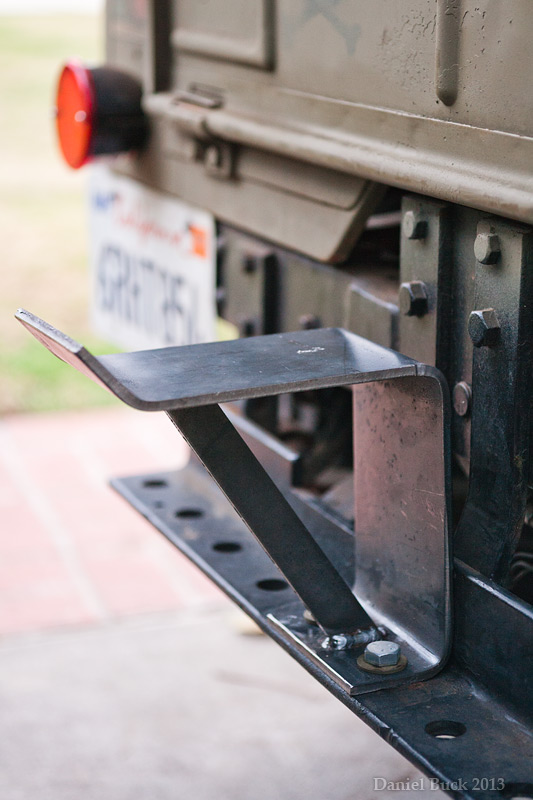
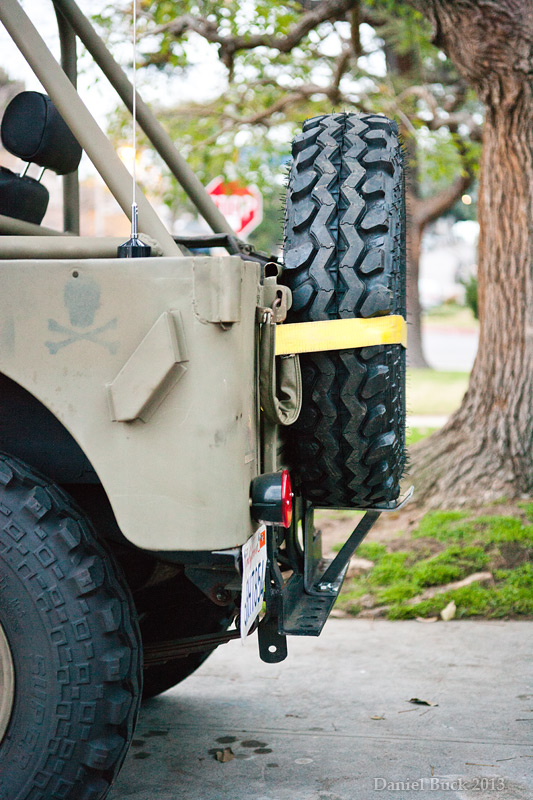
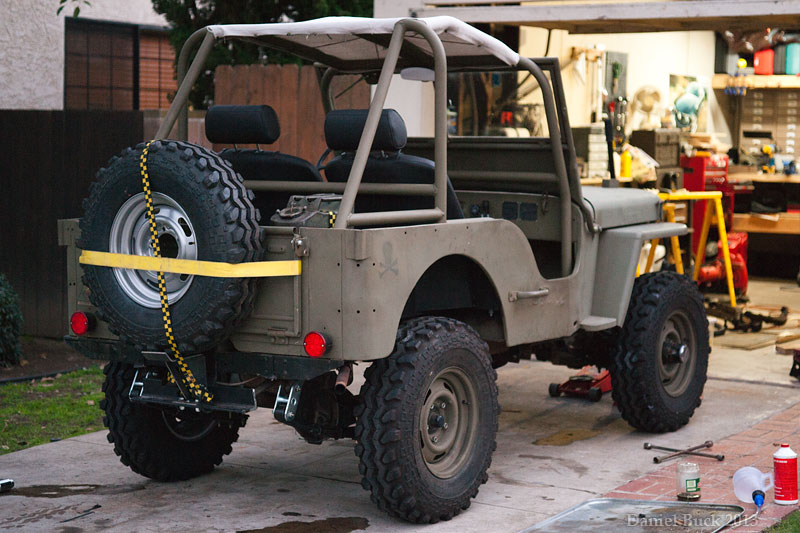
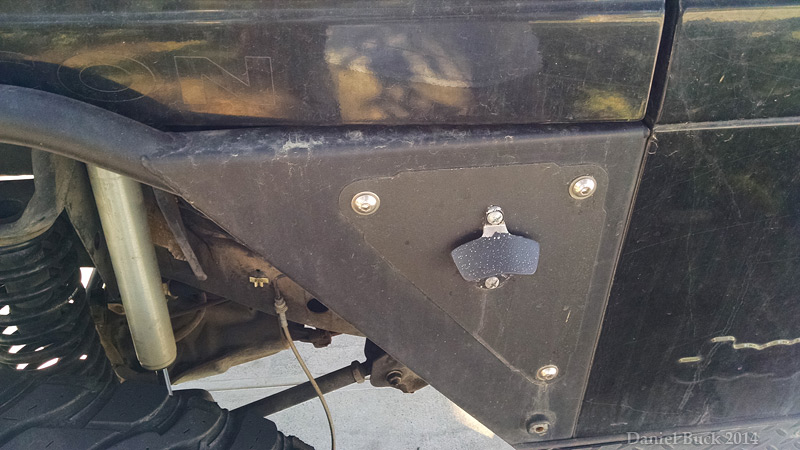
  • Making use of the press brake the top lip that sticks out is several inches to long, but I'm going to leave it long until I actually mount the tire on it, then I'll mark it and trim it where it needs to be, and round off the corners real nice, and weld in a gusset that goes up the middle. I'm quite sure that 1/4" plate will be plenty strong enough without the gusset, but might as well get more metal working practice, and make a gusset that goes from the bottom to the top. Then two bolt holes on the bottom to bolt it to the bumper.


    Last edited by daniel_buck; 01-27-13, 05:31 PM.
    [COLOR="#FF0000"]R[/COLOR]edneck [COLOR="#FF0000"]D[/COLOR]riveway [COLOR="#FF0000"]F[/COLOR]ab
    www.DanielBuck.net - www.DNSFAIL.com - www.FurnitureByBuck.com

    Comment


    • I like how tight your design keeps the spare to the body. I was thinking about building one similar to the one in the jeep mag but it pushes the tire back a few extra inches. I have found that even a little weight hanging off the back really affects the handling and the farther out it hangs the worse it is. I actually really like to keep the spare in the bed but it isn't always possible because I occasionally run a back seat.

      Brett, you feeling better yet?

      Comment


      • Yea, keeping the spare in the tub is not an option for me, especially with the fuel tank back there!
        [COLOR="#FF0000"]R[/COLOR]edneck [COLOR="#FF0000"]D[/COLOR]riveway [COLOR="#FF0000"]F[/COLOR]ab
        www.DanielBuck.net - www.DNSFAIL.com - www.FurnitureByBuck.com

        Comment


        • Did you weld that in yet Daniel? I still feel like azz! Finally taking a Zpack. No fun being sick since Jan 2nd!

          Comment


          • Nah, I've not had time. Worked till 1am yesterday, and back here at work before 8am again... lol! That bracket will be bolted to the bumper. I'll try two good sized bolts straight down to the existing holes in the bumper. If that's not good enough, then I'll drill two holes through the vertical part of the bracket and bolt it to the bumper there as well.

            I guess I'll get the size/shape of the gusset figured out with cardboard, then transfer that drawing to 1/4" plate and cut it out. Now I wish I had a plasma cutter, haha!


            Dang man, you got some serious sick going on, hope it doesn't last to much longer!
            [COLOR="#FF0000"]R[/COLOR]edneck [COLOR="#FF0000"]D[/COLOR]riveway [COLOR="#FF0000"]F[/COLOR]ab
            www.DanielBuck.net - www.DNSFAIL.com - www.FurnitureByBuck.com

            Comment


            • Cal-Aero in Paramount is a good place to get big bolts and all sorts of hardware and other cool stuff at a pretty good price:
              http://www.calaerosupply.com/

              The plasma cutter is money well spent, I don't know how I did without for so long.

              Comment


              • finished the support bracket


                I'll drive around with it for a week or so to make sure that just bolting it down with 2 bolts on the bottom is sufficient, if it is, then I'll spray it black. And I'll probably bolt the tail gate shut instead of using the hooks on the chains.

                And I'll add a ratchet strap that is vertical as well. If the ratchet straps end up working real good, I'll probably just leave it strapped on there! My only concern would be someone unstrapping them and walking away with the spare, but I guess the same could be done on most any other rear-mounted spare tire with just a wrench, so I guess I'm not to worried. Any ideas on a way of locking it maybe? Maybe running one of those thick flexable bicycle locks through the lugs and down into the crossmember/bumper?

                I drove it through the back alley a few times to hit the pot holes, no rattling on the tail gate


                [COLOR="#FF0000"]R[/COLOR]edneck [COLOR="#FF0000"]D[/COLOR]riveway [COLOR="#FF0000"]F[/COLOR]ab
                www.DanielBuck.net - www.DNSFAIL.com - www.FurnitureByBuck.com

                Comment


                • Got the rear suspension on today! And after this photo, I got the front's removed, and the shackles installed. Just need to drill out the leaf spring plates to fit the larger U bolts, and then bolt it all back up again

                  Kinda has a hotrod look right now, LOL springs should be 2.5" taller, and the shackles are about 1" taller I think. From the looks of it, I'd say the springs probably gave me more like 4", but maybe they will settle, or maybe I'm wrong (I didn't measure, just guessing). The driveshaft angle looks ok to me, if it gives me problems, I'll throw in some wedges in between the rear springs and axle.

                  Everything has gone really smooth so far. I put the rear brake line in the front, and had a custom length line made for the rear, which cost more than I would have guessed, $40 for a 20" long hose with connectors crimped on the ends! I MAY look at moving the rear axle back an inch or so, I don't see anything that prevents me from doing so (my, aren't leaf springs simple, haha!) but the drive shaft may need to be replaced, or a spacer added. As it is now, at close to full flex I'll be rubbing the inner fender well that was cut and moved back to make room for the seats. We'll see how bad it really is when I get it off road. an inch farther back might help out a good bit, we'll see.

                  It's hard to tell without driving it, but just from grabbing the roll bar and giving it a shake, it feels like the rear suspension is noticably looser, that might be a good thing! As it was with the springs that were on there before, I could stand on the bumper, and it would only go down just barely, haha


                  [COLOR="#FF0000"]R[/COLOR]edneck [COLOR="#FF0000"]D[/COLOR]riveway [COLOR="#FF0000"]F[/COLOR]ab
                  www.DanielBuck.net - www.DNSFAIL.com - www.FurnitureByBuck.com

                  Comment


                  • Got the front suspension on, and bled the brakes. Pedal still feels a bit soft, but it stops well enough. I'll bleed them some more later.

                    Problem though, is the driveshaft, I can hear it thump thump thump as I go. I guess I either need wedges in the rear to rock the axle back, or a double CV driveshaft. wedges are cheaper, so I'll give that a try first! I've got some 6 degree wedges on order. I really don't want to drop the transfer case (I dislike that idea!)

                    Hard to tell how it rides, my road is actually pretty smooth, and as soon as I realized the driveshaft sound, I immediately turned around and came back. Standing on the bumper, the suspension goes down a little bit, so it's probably softer than before, not sure how much though. Still feels a little higher than I was expecting, but we'll see if it settles down

                    Oh and the squeaking at the end of the 2nd video, that's not the suspension, that's my clutch pedal. I like the squeak,

                    http://youtu.be/xIQMGYFUyUI

                    http://youtu.be/HOl4RjnUraU


                    [COLOR="#FF0000"]R[/COLOR]edneck [COLOR="#FF0000"]D[/COLOR]riveway [COLOR="#FF0000"]F[/COLOR]ab
                    www.DanielBuck.net - www.DNSFAIL.com - www.FurnitureByBuck.com

                    Comment


                    • making new mirror mounts for the TJ (for when the doors are off), the old ones I made are kind of flimsy, (tubing wasn't thick enough) these will be rock solid Got the shape right, I'll finish it up tomorrow and make a second one.

                      Simple enough, but an excuse to use the shop press

                      Last edited by daniel_buck; 03-10-13, 11:43 PM.
                      [COLOR="#FF0000"]R[/COLOR]edneck [COLOR="#FF0000"]D[/COLOR]riveway [COLOR="#FF0000"]F[/COLOR]ab
                      www.DanielBuck.net - www.DNSFAIL.com - www.FurnitureByBuck.com

                      Comment


                      • Crude, but very solid, haha! I'll probably paint it black, and the back of the mirror as well.


                        [COLOR="#FF0000"]R[/COLOR]edneck [COLOR="#FF0000"]D[/COLOR]riveway [COLOR="#FF0000"]F[/COLOR]ab
                        www.DanielBuck.net - www.DNSFAIL.com - www.FurnitureByBuck.com

                        Comment


                        • Looking good Daniel!

                          Comment


                          • new driveshaft and spring perches! In hind site, now that the angle is corrected, I might have not needed the double joint driveshaft, at least for street driving anyway. But with the angle almost corrected (with the wedges, before) it was binding at full droop.

                            Not the best welds on the spring perches, but I think they will hold


                            [COLOR="#FF0000"]R[/COLOR]edneck [COLOR="#FF0000"]D[/COLOR]riveway [COLOR="#FF0000"]F[/COLOR]ab
                            www.DanielBuck.net - www.DNSFAIL.com - www.FurnitureByBuck.com

                            Comment


                            • not really home made, but I'll post it anyway. The latest addition to my TJ


                              [COLOR="#FF0000"]R[/COLOR]edneck [COLOR="#FF0000"]D[/COLOR]riveway [COLOR="#FF0000"]F[/COLOR]ab
                              www.DanielBuck.net - www.DNSFAIL.com - www.FurnitureByBuck.com

                              Comment


                              • No photos yet, but on the Willys, I took out the old muffler (which is where the future gas tank will go!) and put a new muffler (which is next to the transfer case now, instead of in the rear) and piping pieces on.

                                I need one more 45 degree bend, and it's done. Pepboys only had one 45 degree bend, and I needed two! Oh, I should have just purchased a bender, LOL But regardless, I think I can get the exhaust pretty close to the inside of the rear leaf spring, which should hopefully leave enough room for a tank under there.

                                It's somewhat of a hack job, because I couldn't find a muffler, or piping that was 1.5" in diameter (HAHA!!) so I had to step the exhaust up to 2.5" at the muffler, and then use 2.5" for the rest of the exhaust. Kind of odd I guess, but it's not leaking, and it sounds good so far! I'm surprised how good the 4 cylinder flat head sounds with a flowmaster muffler, it's deep and has a bit of growl to it! It's a tad bit loud right now, but I think it will get quieter once the pipe runs all the way out the back, right now it's still not passed the rear axle yet. And if I remember correctly on my old Camaro, dumping before the axle makes things alot louder. Maybe eventually I'll just run 2.5" all the way to the exhaust manifold. Man, that exhaust is super rusted, you just get close to it and you have rust color all over you, haha!
                                Last edited by daniel_buck; 03-31-13, 04:43 AM.
                                [COLOR="#FF0000"]R[/COLOR]edneck [COLOR="#FF0000"]D[/COLOR]riveway [COLOR="#FF0000"]F[/COLOR]ab
                                www.DanielBuck.net - www.DNSFAIL.com - www.FurnitureByBuck.com

                                Comment

                                Working...
                                X