Announcement

Collapse
No announcement yet.

Buck's random home-made things.

Collapse

Forum Thread First Post

Collapse
X
 
  • Filter
  • Time
  • Show
Clear All
new posts

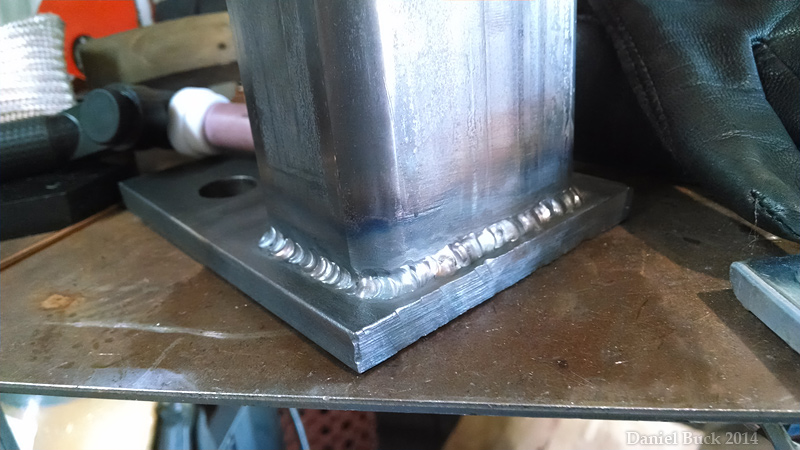
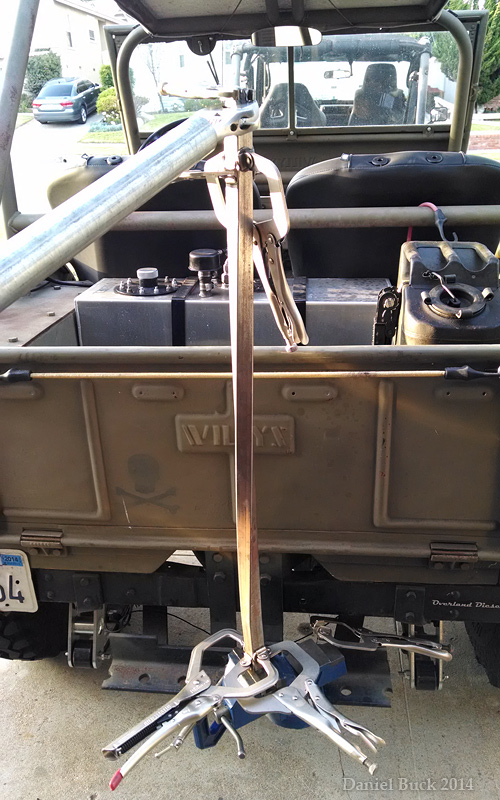
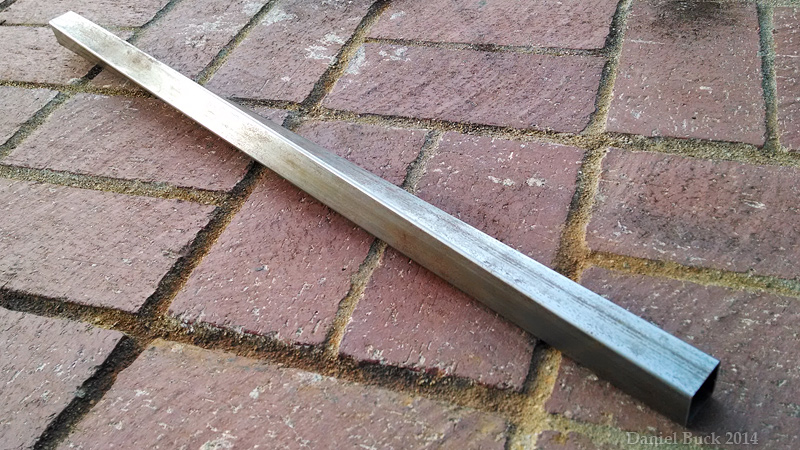
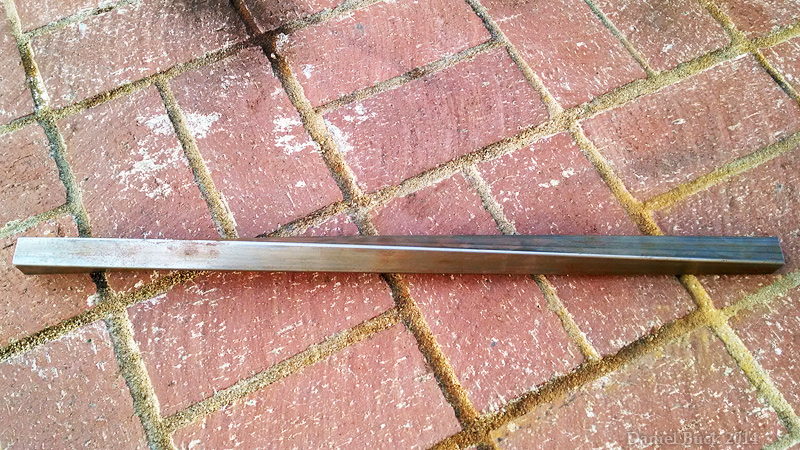
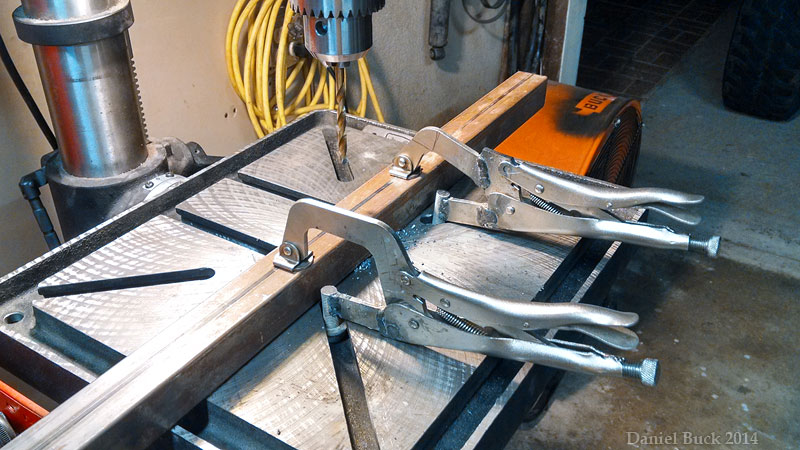
  • Well back to more TIG work! This time, making a mount for my JD2 tube bender. I don't want to mount it into the concrete, because I really don't have room in the garage to mount it, and I don't think my landlord would like me mounting anything in the driveway. So, I'm going to bolt it to the bumper of my Willys. This is the top part of the mount (in these photos, it's upside down) which the bender itself will mount to.

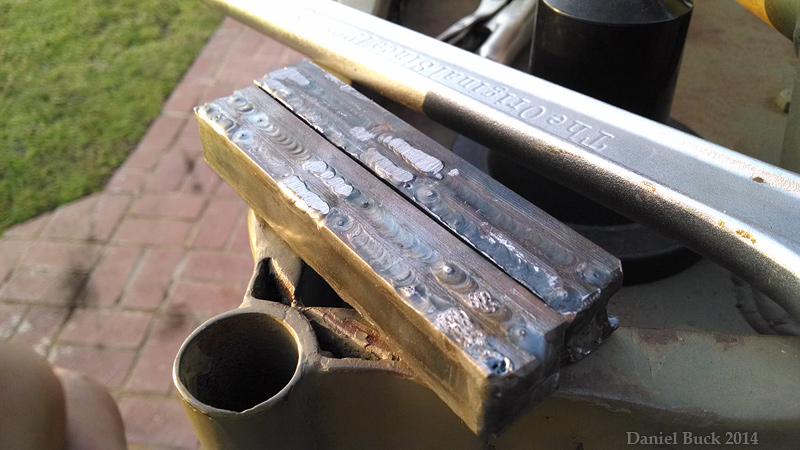
    The metal is probably way to thick for me running 120 volts, but it should be fine for bending 16 gauge 1" square tubing. Once I eventually step up to some thicker wall stuff, I'll probably take the mount over to a friends house with 220, and plug my machine in there and run another pass or two over this weld to make sure it's good and solid.

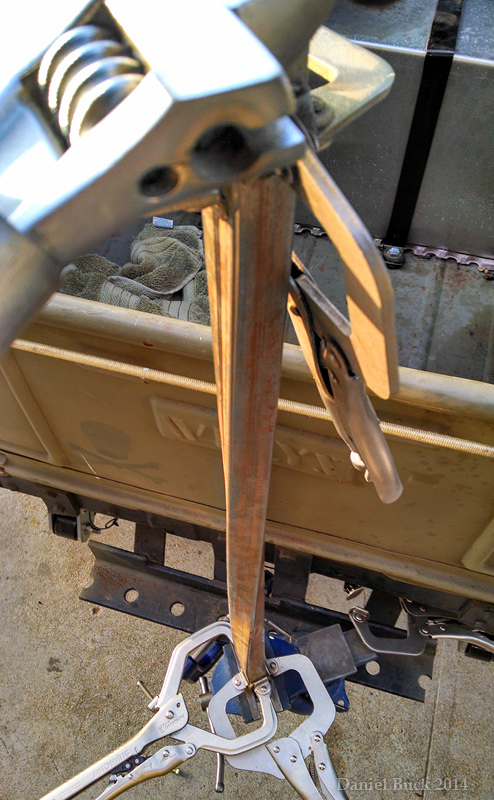
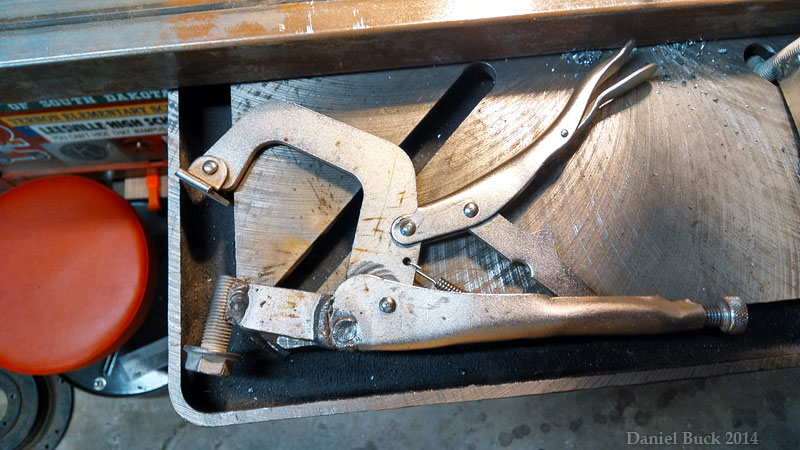
    The welds aren't as consistant as I'd like, I need more practice! The scrap/dropoff pile at the local steel shop wasn't as plentiful as it was last time, so some of this metal is thicker than I'd like it to be. The rectangle tubing is 1/4" wall, and the plate is a bit thicker. When I put the bottom plate on the mount, I'll torch it so that it's already hot when I start welding. It was evident that the thick plate was sucking up alot of heat. I'd have to sit there for quite a while with the torch before a decent puddle would form, then I'd add my filler. It didn't flow very well. Only after I had run a few short welds did it heat up and then start to weld easier. But even then it didn't flow to well. The metal is just to thick for my power.


    Last edited by daniel_buck; 03-21-14, 09:39 PM.
    [COLOR="#FF0000"]R[/COLOR]edneck [COLOR="#FF0000"]D[/COLOR]riveway [COLOR="#FF0000"]F[/COLOR]ab
    www.DanielBuck.net - www.DNSFAIL.com - www.FurnitureByBuck.com

    Comment


    • Cool that you got yerself a TIG machine, and a pretty nice one as the Chinese stuff goes!
      holes = cowbell

      Comment


      • I'm slowly getting some seat time with it. I feel more confident for sure, but I need ALOT more seat time before it's solid I think. And this thick metal is giving me trouble. I need more juice, I can barely keep the puddle alive! But maybe that might be teaching me some techniques... or at least it's teaching me to know what it looks like when I have to much metal and not enough juice

        My filler rod hand is alot better now. I'm trying to alternate left and right, sometimes put the torch in the left hand, sometimes in the right hand. Oddly enough as a right handed person, I feel better with the torch in my left hand and the filler rod in my right. Not sure why that is. But in either case, both hands need practice with the torch and the filler.


        Here's the finished bottom brace.


        And added a brace onto my friend's skid plate arm, being bent like that it didn't seem very strong, I put a gusset on it.


        Last edited by daniel_buck; 03-24-14, 11:15 PM.
        [COLOR="#FF0000"]R[/COLOR]edneck [COLOR="#FF0000"]D[/COLOR]riveway [COLOR="#FF0000"]F[/COLOR]ab
        www.DanielBuck.net - www.DNSFAIL.com - www.FurnitureByBuck.com

        Comment


        • That looks like it will hold. The beads aren't all uniform and beautiful, but more importantly, they seem to be pretty flat (as opposed to concave or overly convex), and you don't seem to have much, if any undercut. The bead in the foreground is actually pretty nice.

          One technique I avail myself of with thicker material is v-notch, root pass, fill pass, and cover pass. The one that requires the most heat is the root pass, but you can design your joint according to how much penetration you can get. Keep in mind that it can warp the heck out of stuff, so take appropriate precautions.
          holes = cowbell

          Comment


          • Well, I did bend the bottom plate a bit, I didn't expect that would, but I did! It won't be a problem for the tube bender, but it was something I didn't expect. Multi-pass welds are something I haven't done much, I'd like to do more of that
            [COLOR="#FF0000"]R[/COLOR]edneck [COLOR="#FF0000"]D[/COLOR]riveway [COLOR="#FF0000"]F[/COLOR]ab
            www.DanielBuck.net - www.DNSFAIL.com - www.FurnitureByBuck.com

            Comment


            • Looks like you're improving pretty fast! If you only had 220...

              TIG puts more heat into the work than does MIG and tends to distort things more if you're not careful. Not that I'm "old hand" at it, but I still surprise myself with how easy it can be to warp stuff.
              holes = cowbell

              Comment


              • Finally got a small bandsaw setup. Busted out a quick test, man it's real nice to use!

                I think I might have needed a little bit more gas on the welds, I got a bit of porosity in a few of them. No filler.


                [COLOR="#FF0000"]R[/COLOR]edneck [COLOR="#FF0000"]D[/COLOR]riveway [COLOR="#FF0000"]F[/COLOR]ab
                www.DanielBuck.net - www.DNSFAIL.com - www.FurnitureByBuck.com

                Comment


                • 7S02 filler rod (std for mild steel) contains deoxidizers do help minimize porosity. Even a little filler can help significantly.

                  That's kinda neat-o. What is it?
                  holes = cowbell

                  Comment


                  • It's a fleur de lis. Among other things, it's the official symbol of Louisiana. Usually more curvy, but I kinda liked the angles It's design is altered quite a bit all the time, I think it's basically designed off of a flower.


                    This is 1/8" thick BTW. Band saw handled it no problems! I'm not sure how much of a curve I can cut, but I don't plan on really cutting curves with it to often. If I do need a curve, I'll make a few straigt cuts and then probably just grind it to a curve.

                    Yea, 70S2 is what I normally used, I wanted the weld to be as flat as possible, so I thought I'd try it with no filler, since the fitup was pretty tight. I'll try some filler next time. Although it's kinda neat welding without filler, haha! I'm going to make some larger ones as well. I need to pick up more 1/8" sheet.
                    Last edited by daniel_buck; 04-12-14, 03:17 PM.
                    [COLOR="#FF0000"]R[/COLOR]edneck [COLOR="#FF0000"]D[/COLOR]riveway [COLOR="#FF0000"]F[/COLOR]ab
                    www.DanielBuck.net - www.DNSFAIL.com - www.FurnitureByBuck.com

                    Comment


                    • Aaaand got another tool finished and ready to use. Finally had time to get this bender assembled, and give it a test go. It's kinda complicated for what it is, but after I figured it out it makes sense.

                      Mounted it to my bumper, because I didn't want to drill into the concrete (I don't own the property) Now if I could just get this thing to be PTO operated.... ;-)


                      [COLOR="#FF0000"]R[/COLOR]edneck [COLOR="#FF0000"]D[/COLOR]riveway [COLOR="#FF0000"]F[/COLOR]ab
                      www.DanielBuck.net - www.DNSFAIL.com - www.FurnitureByBuck.com

                      Comment


                      • So, being that space is limited for me, I've got an idea to make a modular stand to hold various items. Bench grinder, bench vice, scroll saw, band saw, and what not. Basically, everything accept for the tube bender, since the tube bender is so heavy and so awkward to carry when it's not mounted, I think that one is best left to a stand of it's own.

                        For these other items, they don't really need to be solidly mounted to the floor. So, I've got this old flywheel from the diesel motor that is in the willys, it's 13" across and weighs 43 pounds. I figure this would probably make a good base for the mount. I'll pick up some tubing and make a T shape that is somewhat less than chest high, and a platform on either end of the T arms so that I could have two of the said tools mounted at once (or in the case of the scroll saw and band saw, probably just one at a time, since they are larger).

                        the 43lb flywheel seems like it would be heavy enough. And to keep it from wobbling, I'll build up 3 weld spots on the underside so that it's essentially a 3 point contact, 3 points don't wobble on uneven ground, 4 or more do. And the flywheel with no points would wobble. If 43 pounds doesn't feel heavy enough once I've got it together, I've got a ring gear and a few other heavy metal items that I could use for extra weight on the bottom. Hopefully that would be enough.


                        So, I'd like for these items to be fairly quickly and easily swapped out. But short of having to put in several bolts and nuts each time I swap out a tool, I can't think of any way that would not cause any wobbling. Any ideas for a mounting system that might be quicker and easier than literally bolting down every item each time? I was thinking I could make a plate and some sort of mounting surface for each tool, and that could be installed with a quick release pin. However, that would probably let the tool wobble around quite a bit, I don't think that would do. If undoing and redoing 3-4 bolts every time is what it takes, then that would be ok, but I wonder if there's any better ideas.


                        Last edited by daniel_buck; 04-14-14, 11:15 PM.
                        [COLOR="#FF0000"]R[/COLOR]edneck [COLOR="#FF0000"]D[/COLOR]riveway [COLOR="#FF0000"]F[/COLOR]ab
                        www.DanielBuck.net - www.DNSFAIL.com - www.FurnitureByBuck.com

                        Comment


                        • So, here was my goal, a 3 foot piece of square tubing (1x1" .065 wall) with a 90 degree twist in it (for furniture stuff, legs and what not). This piece was a little shorter, and I ended up cutting off the top and bottom 3 inches after twisting it because the twist on the ends stops abruptly. I made two solid square slugs to go in both ends, one to clamp down good, and the other to put a wrench and a big breaker bar on. I'm actually surprised it worked as well as it did. I had trouble keeping the tube straight up and down as I was yanking on the breaker bar, I think if I were to keep the axis of the tube straight, it would have been ever better. I'll come up with something for that later

                          This was just my first test, to see if it was actually even feasible. Now that I know it is, I'm going to come up with a better and easier way of doing it, maybe using axle roller bearing on top of the tube, and using a bottle jack to raise the tube up with either my bench press on the top of it, or maybe a bracket that clamp to the rollbar of the willys.


                          Here it is! I used the bumper of my jeep to mount the little bench vice. And a 4 foot piece of fence post (my cheater bar) as leverage on my large crescent wrench. I put clamps on both sides of the tube to keep it from wanting to go round, as my square slugs weren't exactly a tight fit. Now that I know this works, I'll find something solid that's a much tighter fit.

                          Photos of the twisted tube are after i cut off the ends.

                          Once I get something setup to do this that's not quite as jerry rigged, I'm curious to see how far I can take the twist before it deforms badly somewhere? I originally just wanted this, a simple 90 degree twist, but now I'm curious Once I get all this bending tests done, then it's time for furniture!!


                          Last edited by daniel_buck; 04-18-14, 08:03 PM.
                          [COLOR="#FF0000"]R[/COLOR]edneck [COLOR="#FF0000"]D[/COLOR]riveway [COLOR="#FF0000"]F[/COLOR]ab
                          www.DanielBuck.net - www.DNSFAIL.com - www.FurnitureByBuck.com

                          Comment


                          • some updates. The tool stand is done, just trying to decide where I want to mount things. Decided to go with a plate top instead of just a narrow piece of tube, more surface area is probably more useful.

                            Picked up a new (used) drill press, a 1.5hp Jet with a 3/4" chuck, it's quite heavy, I think it'll be the last drill I ever need, short of a mill. (man, I'd love to get ahold of a manual mill and learn to use one! But, I don't have room for that :-( )

                            Hacked up some welding clamps and factory TJ control arm bolts to mount into the t-slots on the drill press table The bolts are a perfect fit for the T-slots! More than enough clamping force, don't look pretty, but damn it works well.

                            My land lord and I will be running 220 into the garage this week, can't wait to play with more power on the welders!

                            I finally quit my job, and will be starting up a new one shortly. Hopefully I'll have more time to play in the garage in the near future I have been working to many 7 day weeks recently.


                            Last edited by daniel_buck; 05-25-14, 12:06 AM.
                            [COLOR="#FF0000"]R[/COLOR]edneck [COLOR="#FF0000"]D[/COLOR]riveway [COLOR="#FF0000"]F[/COLOR]ab
                            www.DanielBuck.net - www.DNSFAIL.com - www.FurnitureByBuck.com

                            Comment


                            • Originally posted by daniel_buck View Post
                              So, here was my goal, a 3 foot piece of square tubing (1x1" .065 wall) with a 90 degree twist in it (for furniture stuff, legs and what not). This piece was a little shorter, and I ended up cutting off the top and bottom 3 inches after twisting it because the twist on the ends stops abruptly. I made two solid square slugs to go in both ends, one to clamp down good, and the other to put a wrench and a big breaker bar on. I'm actually surprised it worked as well as it did. I had trouble keeping the tube straight up and down as I was yanking on the breaker bar, I think if I were to keep the axis of the tube straight, it would have been ever better. I'll come up with something for that later

                              This was just my first test, to see if it was actually even feasible. Now that I know it is, I'm going to come up with a better and easier way of doing it, maybe using axle roller bearing on top of the tube, and using a bottle jack to raise the tube up with either my bench press on the top of it, or maybe a bracket that clamp to the rollbar of the willys.


                              Here it is! I used the bumper of my jeep to mount the little bench vice. And a 4 foot piece of fence post (my cheater bar) as leverage on my large crescent wrench. I put clamps on both sides of the tube to keep it from wanting to go round, as my square slugs weren't exactly a tight fit. Now that I know this works, I'll find something solid that's a much tighter fit.

                              Photos of the twisted tube are after i cut off the ends.

                              Once I get something setup to do this that's not quite as jerry rigged, I'm curious to see how far I can take the twist before it deforms badly somewhere? I originally just wanted this, a simple 90 degree twist, but now I'm curious Once I get all this bending tests done, then it's time for furniture!!


                              To keep it straight while twisting, slip a tube or a pipe over it

                              Comment


                              • Yea, that's the plan for next time! And a friend of mine is milling down a pair of 1x1" chunks of steel so that they fit tighter into the tubing, that should probably help as well.
                                [COLOR="#FF0000"]R[/COLOR]edneck [COLOR="#FF0000"]D[/COLOR]riveway [COLOR="#FF0000"]F[/COLOR]ab
                                www.DanielBuck.net - www.DNSFAIL.com - www.FurnitureByBuck.com

                                Comment

                                Working...
                                X